Michelle’s Kitchen


Originally posted on www.michelles-kitchen.blogspot.com this recipe serves as the master “technique” that I use to create pulled pork. Once cooked to melt-in-your-mouth perfection - pulled pork can be turned into a zillion meals ... Leftover Makeover x’s 1000! Many times the only reason I make pulled pork is for the “Leftover Makeover” recipes ... and the leftovers freeze and re-heat so beautifully - having an extra meal’s worth in the freezer is such a time-saver. More below ...
Pulled Pork is usually made from a cut of meat called Pork Shoulder. Pork Shoulder is typically sold as a large roast-like hunk of meat. It’s relatively inexpensive - it just needs long slow cooking to maximize it’s potential.
Western Style Country Ribs (I prefer bone-in) are cut from Pork Shoulder. When I find these on sale, I stock up because when it comes time to make Pulled Pork, having individual ribs gives me flexibility in how much pulled pork I want to make! On days when I find myself “Cooking For One” - I just use 1-2 ribs and put them in my smaller 3 quart slow cooker and 6-8 hours later dinner is done!
Let’s get started ...
This recipe is shown with Western Style Country Ribs, but if you would rather use Pork Shoulder (Boston Butt), please do ... and you can find them in sizes upwards of 8+ pounds if you are feeding an army!
I love how Molly Stevens in her book, "All About Braising" discusses Shopping for Pork Shoulder - I too much prefer Boston Butt over the Picnic Shoulder. But as she states, both will work well if you're not given the choice.
Thursday, March 24, 2011
Slow Cooker Pulled Pork - Master Technique


Step 5:
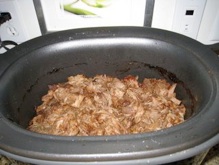
Once the time is up - remove the lid from your slow cooker and discard the parchment paper. Remove the meat to a large dish and - I usually discard the cooking liquid. Or - I will strain it and then boil the liquid down to concentrate the flavors and either make a light sauce-like gravy from it (usually via a light roux) - or add it to a store-bought sauce to give it more of a home-cooked flavor.
Once the meat has cooled enough to handle it, (the meat should fall apart on you), you'll easily be able to remove the bones and excess fat - discard. I prefer to use bone-in meat choices whenever possible because the flavor is better - yum!
-
*If you are using a large Pork Shoulder (Boston Butt), you'll just have a small bone that will "pop" out during cooking time.
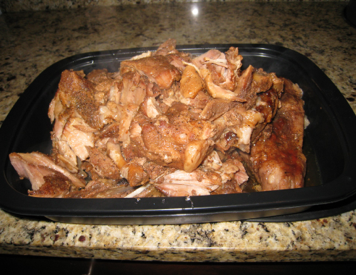
Step 6:
Now it's time to eat! Now that you have a nice amount of shredded pork - return your “de-boned”, drained and pulled (shredded) pork back into the slow cooker and if you like a more “wet” feel to your pulled pork, feel free to stir in any sauce you like ... see ideas in step 5.
I have served this on homemade Onion Buns or Sweet Rolls (as a sandwich) with a simple side salad. It's also amazing next to Garlic Mashed Potatoes and Green Beans or Honey Glazed Carrots. You could also vary the seasonings a bit for pork tacos.
I make this meal in my slow cooker all year long - in the summer, it's lovely because the house doesn't get "hot" from cooking and I am free to do all the fabulous activities summer has to offer!
Here are some other tidbits from www.michelles-kitchen.blogspot.com:
Re-heating Instructions ... pretty simple: You can reheat it in the microwave (I recommend 70% power), on the stovetop over medium-low heat or in a dutch oven in a low oven (250 - 300 degrees)... Just add more sauce and you've got dinner (or lunch!)
If you're Making This Meal Ahead of Time ... say like you cooked it overnight and plan to eat it the following night for dinner ... go ahead and add your additional sauce ... then cool your shredded meat and transfer to the refrigerator. When you're ready to reheat the meal, adjust any seasoning/sauce if needed.
If you're Freezing this meal for future use, (after adding additional sauce) cool your shredded meat and then transfer to the refrigerator to completely cool. Once the meat is completely cooled - transfer it to freezer-safe plastic zippered bags and remove as much air from the bags as you can (laying the bag completely flat). Once the bag is flattened, place it in the freezer. Once frozen, it will stack.
Freezing Tip - if you are Cooking For One - or just making more than one bag for the freezer, after you have flattened your bags, place a sheet of wax paper between the bags prior to loading into the freezer. This will save you unnecessary frustration by keeping your zippered plastic bags from freezing together! Trust me, I learned the hard way!
Making this Meal For Others - if you are planning to freeze this meal or make it ahead of time as a meal for someone - write the re-heating instructions on the bag or on a nice card.
Step 1:
Grab whatever meat you are using - pork shoulder or western country style ribs.
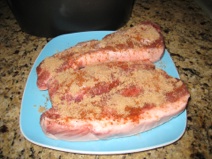
Step 2:
Season your meat liberally!
Here’s where the “TECHNIQUE” comes in ... be the Executive Chef in your household ... I almost always use brown sugar to start with and then add whatever spices look good to me that day ... often something smoky like chipotle powder, toasted onion powder - sometimes pork seasoning - I usually look for things with a smoky type appeal - because I’m doing this indoors and not outdoors on the smoker!
Step 3:
Load the meat into the slow cooker and pour (spoon) a small amount of cooking liquid over top.
Cooking “liquid” in terms of a slow cooker is a loose term. Slow Cookers need very little liquid to work - because essentially they create moisture which in turn becomes a flavorful cooking liquid made mostly from the juices of your meat ... so you don’t want to dilute what nature can give to you!
I most often use BBQ sauce and I usually add a few squeezes of ketchup, mustard, honey or maple syrup. I often add in a few drops of liquid smoke. Other liquids I enjoy using are sodas ... coke and root beer. I recently used Tangy Tomato salad dressing mixed with a bit of hot sauce and apple cider vinegar. The technique is what you learn - you vary the taste to what you like!
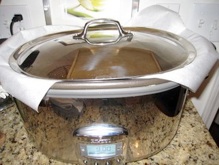
Step 4:
Place a sheet of Parchment Paper (NOT wax paper) on top of your meat. Press it down so it barely touches the meat. Then place the lid on your slow cooker and allow the edges of the parchment paper to hang over. Set your slow cooker to LOW and if you have a timer, set it for 8-10 hours (depending on how much meat you have loaded into your slow cooker).
The parchment paper is not a required step. After a few years of slow cooking, I find having the parchment paper there intensifies the flavor just a little bit more. I could go on to explain how the dynamics work even further, for today - try it!
Now that your slow cooker is set - GO and do whatever you need to do. This way of cooking offers you flexibility and freedom!
(*) You could cook this overnight while you are sleeping! Just refrigerate it until ready to eat. Or freeze it for a future meal(s). You can reheat it in the microwave, on the stovetop or in a dutch oven in a low oven ... just add more sauce and you've got dinner (or lunch!)
Regardless of what you do - you have 8+ hours of unattended cooking!