Michelle’s Kitchen


You can make this up to 5 days in advance and store in your refrigerator - or you can freeze it for a later use! It makes fabulous Pizzeria Style Garlic Breadsticks and wonderful Flatbread ... and we’ve also used it for countless other recipes such as Calzones and Dessert (think elephant ears) sprinkled with cinnamon-sugar!
I have certainly had my share of unpleasant experiences when I was first getting started making yeast doughs. I am completely self-taught - and had no idea what I was getting into. So my prayer is I can share a few things I have learned along the way - but certainly by no means am I an expert!
This recipe is adapted from one called Make-And-Bake Pizza in The New Food Processor Bible by Norene Gilletz. Click on the title to be directed to the book.
Sunday, April 17, 2011

If yeast was a woman - I think we could be/would be friends. Yeast is able to set boundaries and those who befriend her must follow her rules - ha! Oh yeah - and sometimes those rules change :)
Yeast needs to be activated in order to work - and in order for you to see if it is still “alive”. The way you do that is to sprinkle a package of dry yeast into 1/4 cup of warm water ... warm water than must be between 105 - 115 degrees. I also typically add a pinch of sugar to the water as “food” for the yeast. And, I always, always use a thermometer to test my water - those are rules I follow.
Yeast takes about 5-10 minutes to get creamy and foamy. (You may need to stir it a bit). And if it doesn’t get foamy - you’ll need to start over - It’s “dead” ...
Making dough in the Food Processor is a wonderful time (and energy saver). The other day I was in need of releasing some aggression - that’s when I make dough by hand because the kneading process allows me to re-focus my thoughts on to better things.
My FP has a Dough Blade and a Dough Cycle - if yours does not - use your Steel Blade. While you’re yeast is dissolving - all you’ll you need to do is dump your dry ingredients into the bowl of your food processor ... those are Flour (which you can use a combination of white and whole wheat or other specialty flours) ... Sugar and Salt. I also add about a teaspoon of Garlic Powder (skip this if you’re going to make cinnamon-sugar dessert treats). Pulse these a few times to be sure they are mixed up nicely.
Then it’s time to add the wet ingredients. Turn on the food processor and slowly drizzle through the foamy yeast mixture through the feed tube - and process about 10 seconds. Why that’s important - is because the heat of the food processor itself can get the dough too hot - meaning it could potentially “kill” the yeast in your newly forming dough.
Then - drizzle through the remainder of your wet ingredients - which would be a mixture of 1 cup of lukewarm water and 1 tablespoon extra-virgin olive oil. Sometimes I start with 1/2 cup of water and add more if needed. (I don’t take the temperature of this water - just be sure it’s NOT hot water.)
Then you let the food processor do the work - if you have a Dough Cycle on your FP - use that and let it process until the dough cleans the sides of the bowl ... Otherwise just turn the FP on until it forms a mass and clears the sides of the bowl. You may need extra flour nearby in case the dough is too wet - it should be sticky - the flour gets added through the feed tube if necessary.
Then pull the dough from the bowl of your FP and knead it until it forms a somewhat smooth surface - it should not be stiff - it should be springy - and if the dough is sticking to your hands - wash them, dry them and that usually helps - something about clean dry hands. If the dough is really too wet - add flour and knead in pinches at a time - my dough is never perfect and it still works great - it’s really the best way for you to learn if you’re new to this yeast-dough game.
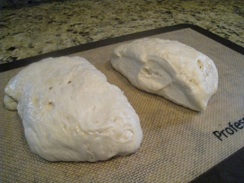
Then allow the dough to rise for 15 minutes - up to 2 hours. And that’s when it starts to look beautiful - and you can go ahead and use it as your recipe states.
If you’re like me - I’m typically not making the recipe with the pizza dough that day - so I divide it in half and put it in an oiled plastic zipper bag and store in the fridge - or the freezer.
So when I’m ready to use my dough - I pull it from the refrigerator and allow it to sit at room temperature for about 15 minutes and then move forward!